

How To Get Camera Feed Intel T265
Intel RealSense T265
This article explains how to setup an Intel Realsense T265 for use with ArduPilot as a substitude for a GPS allowing position control modes like Loiter, PosHold, RTL, Auto to piece of work. This method uses a python script running on an RPI companion computer to send position data to ArduPilot without the use of ROS. The setup using ROS is here.
What to Buy
- Intel RealSense Tracking Camera T265
- Raspberry Pi four (2GB or 4GB recommended, 8GB has issues) or Raspberry Pi 3
- 16GB (or larger) SD card
- PiConnectLite to connect the RPI to the autopilot (optional)
Note
The RPI4 supports USB3 which allows both pose + image data to be captured from the camera. The slower RPI3 only has USB2 meaning simply pose data tin can be captured although this is sufficient for about users.
Hardware Setup
- Download the latest APSync Ubuntu image (found here) to your PC and then flash information technology to the 16GB (or larger) SD bill of fare using a tool such as Etcher or Win32DiskImager so insert it into the RPI's SD Carte slot
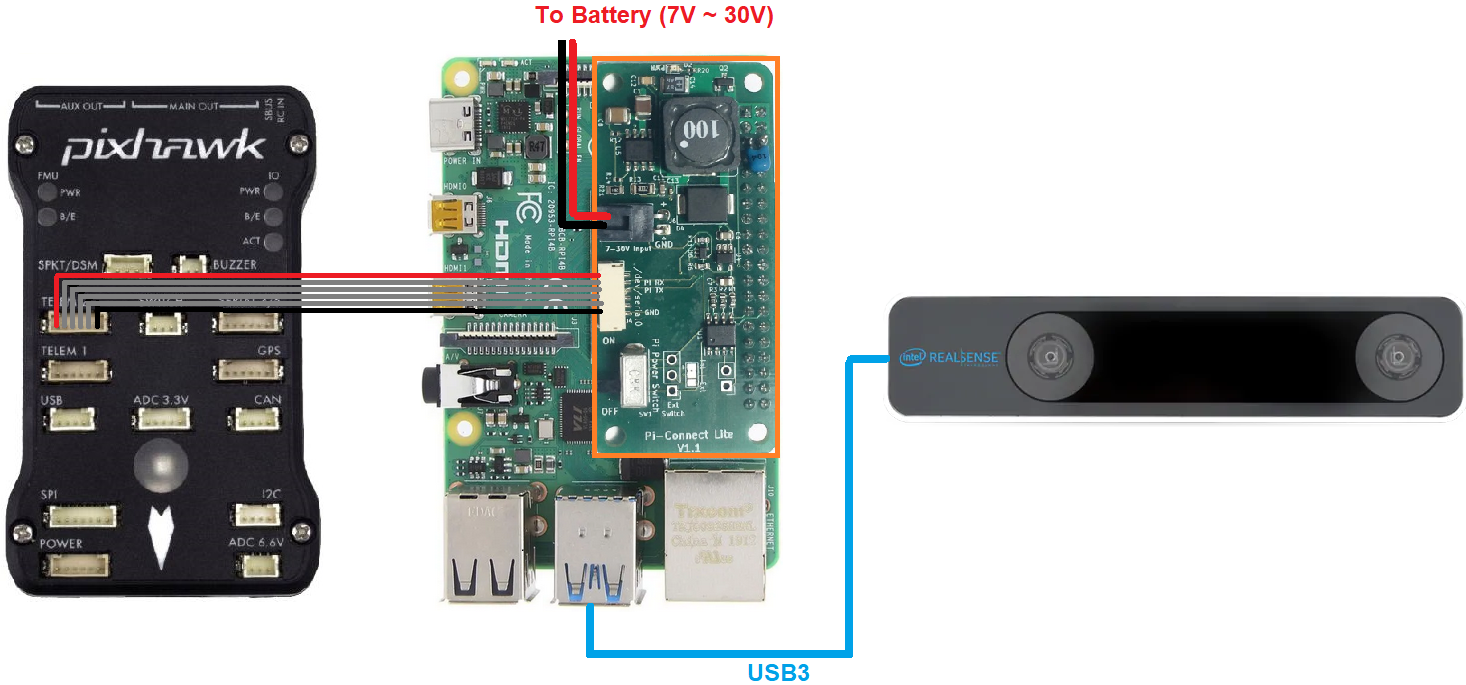
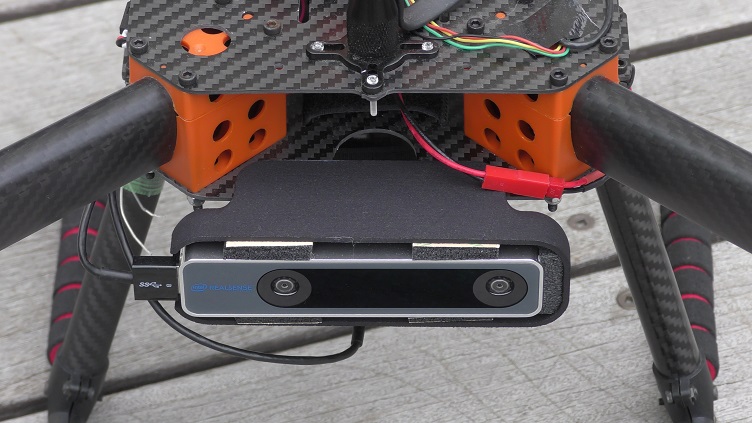
- Mount the Intel RealSense T265 on the vehicle facing forward (see below for information other orientations) using thick double sided tape or David Sastre'due south T265 mount to better isolate the photographic camera from vibrations
- Connect the Intel RealSense T265's USB cable to one of the RPI4'south blueish USB3 ports
- Connect the PiConnectLite'due south power cable to the bombardment (7V to 30V)
- Connect the PiConnectLite's serial cable to one of the autopilot's telemetry ports (i.east. Telem1, Telem2). The just signals used in this cable are TX, RX and GND. The other signals are NC.
David Sastre'due south T265 mount
Configure ArduPilot
Connect to the autopilot with a footing station (i.e. Mission Planner) and check that the following parameters are ready:
- SERIAL2_PROTOCOL = 2 (MAVLink2). Note this assumes the RPI4 is continued to AutoPilot "Telem2" port.
- SERIAL2_BAUD = 921 (921600 baud)
For ArduPilot-4.0 (and before):
- AHRS_EKF_TYPE = ii (the default) to use EKF2
- EK2_ENABLE = 1 (the default)
- EK3_ENABLE = 0 (the default)
- EK2_GPS_TYPE = 3 to disable the EKF's employ of the GPS
- EK2_POSNE_M_NSE = 0.1
- EK2_VELD_M_NSE = 0.i
- EK2_VELNE_M_NSE = 0.i
- GPS_TYPE = 0 to disable the GPS
- COMPASS_USE = 0, COMPASS_USE2 = 0, COMPASS_USE3 = 0 to disable the EKF's employ of the compass and instead rely on the heading from external navigation data
Subsequently the parameters are modified, reboot the autopilot. Connect with the ground station and (if using Mission Planner) right-mouse-button-click on the map, select "Set Home Hither", "Set EKF Origin Here" to tell ArduPilot where the vehicle is and it should instantly appear on the map.
For ArduPilot-4.1 (and later):
- AHRS_EKF_TYPE = 3 (EKF3)
- EK2_ENABLE = 0 (disabled)
- EK3_ENABLE = 1 (enabled)
- EK3_SRC1_POSXY = 6 (ExternalNav)
- EK3_SRC1_VELXY = 6 (ExternalNav)
- EK3_SRC1_POSZ = one (Baro which is safer because of the camera'south weakness to high vibrations)
- EK3_SRC1_VELZ = 6 (ExternalNav)
- GPS_TYPE = 0 to disable the GPS
- VISO_TYPE = 2 (IntelT265)
If you wish to use the camera's heading:
- COMPASS_USE = 0, COMPASS_USE2 = 0, COMPASS_USE3 = 0 to disable all compasses
- EK3_SRC1_YAW = 6 (ExternalNav)
If you wish to use the autopilot's compass for heading:
- COMPASS_USE = 1 (the default)
- EK3_SRC1_YAW = 1 (Compass)
- RC7_OPTION = eighty (Viso Align) to allow the pilot to re-align the camera's yaw with the AHRS/EKF yaw before flying with auxiliary switch vii. Re-aligning yaw before takeoff is a practiced idea or loss of position command (aka "toilet bowling") may occur.
Subsequently the parameters are modified, reboot the autopilot. Connect with the ground station and (if using Mission Planner) right-mouse-push button-click on the map, select "Set Dwelling Here", "Ready EKF Origin Here" to tell ArduPilot where the vehicle is and it should instantly announced on the map.
But before flying, pick up the vehicle to a height of 1m and and so put it down again. This allows the camera to calibrate its vertical scaling.
If yous wish to switch between GPS and T265 come across the GPS/Not-GPS Transitions wiki folio
System Overview

In a nutshell, the half-dozen-DOF pose data (position and orientation) and confidence level obtained from the Realsense T265 will exist processed by our python script and send to ArduPilot through MAVLink. Overall, the script will practice the following tasks:
- Obtain vi-DOF pose data and tracking confidence level data using relevant APIs from
pyrealsense2, which is the Python wrapper forlibrealsense. - Perform necessary matrix transformation to marshal the frames of the Realsense T265 and NED frame equally well every bit other processing steps.
- Pack pose data into MAVLink bulletin VISION_POSITION_ESTIMATE and confidence level data into a dummy message, then transport them to ArduPilot at a predetermined frequency so as to not flood the Autopilot with incoming data.
- Automatically gear up EKF dwelling house for uncomplicated setup and flying.
Note
For the sake of brevity, explanation of the system will be kept curt. More in-depth word tin can be found in the following blog posts: role 4, part 5.
Install librealsense and pyrealsense2 
The Realsense T265 is supported via librealsense on Windows and Linux. Installation process varies widely for unlike systems, hence refer to the official github page for instructions for your specific organization:
- Ubuntu
- Jetson (Compiling from source is needed to get the Python wrapper
pyrealsense2) - Odroid
- Windows
- Raspbian
For RPi running Ubuntu, the installation procedure for librealsense has been detailed in this wiki. Follow the instructions to install librealsense and pyrealsense2 . Since we are not using ROS, realsense-ros is not required.
Python Packages Installation
- Establish serial connexion: Connect RPi to ArduPilot with MAVLink.
- If the connexion between RPi-ArduPilot is established via the UART serial port, also change the setting in /kicking/config.txt.
- Install Python3.
- You should be able to run the examples provided by Intel can be constitute in the folder
~/librealsense/wrappers/python/examplewith Python3 command.
- You should be able to run the examples provided by Intel can be constitute in the folder
# Update the PYTHONPATH environment variable to add the path to the pyrealsense2 library consign PYTHONPATH = $PYTHONPATH:/usr/local/lib cd ~/librealsense/wrappers/python/examples # You lot should see a stream of data coming from the T265. python3 t265_example.py - Install pip for Python3 (pip3).
- Install Python packages:
# pip install may require sudo, and then proceed accordingly pip install pyrealsense2 pip3 install transformations pip3 install dronekit pip3 install apscheduler # Install serial packages for serial connexion sudo pip3 install pyserial - Download the script t265_to_mavlink.py. In example you accept downloaded the vision_to_mavros package, it can be found in the script binder.
# Navigate to the location of the scripts cd ~/path/to/the/script/ # Download the script if you haven't already: wget https://raw.githubusercontent.com/thien94/vision_to_mavros/master/scripts/t265_to_mavlink.py chmod +10 t265_to_mavlink.py How to run
- Before the script can be run, the
PYTHONPATHenvironment variable needs to be added with the path to thepyrealsense2library. Alternatively, re-create the build output (librealsense2.and soandpyrealsense2.thenin~/librealsense/build/) next to the script. Outset, run the test scriptt265_test_streams.pyto verify installation ofpyrealsense2and the T265 is connected.
# Update the PYTHONPATH environment variable to add the path to the pyrealsense2 library consign PYTHONPATH = $PYTHONPATH:/usr/local/lib # Navigate to the location of the scripts cd ~/path/to/the/script/ # Download and run a test script, you should see a short stream of pose information coming from the T265 on the terminal wget https://raw.githubusercontent.com/thien94/vision_to_mavros/main/scripts/t265_test_streams.py chmod +x t265_test_streams.py python3 t265_test_streams.py - Change parameters in the
t265_to_mavlink.pyscript for your organization configuration. Most chiefly, find and alter the following parameters in the script:
# Default configurations for connection to the FCU connection_string_default = '/dev/ttyUSB0' connection_baudrate_default = 921600 # Default frequency for pose and conviction messages vision_msg_hz_default = xxx confidence_msg_hz_default = i # Transformation to convert different photographic camera orientations to NED convention. Replace camera_orientation_default for your configuration. # 0: Frontwards, USB port to the correct # 1: Downfacing, USB port to the right camera_orientation_default = 0 - The parameters tin can also be passed as input arguments from the control line. Now let's run the master script:
# For serial connectedness: set udev.rules in order to go the USB bachelor; allow permission to serial sudo chmod 666 /dev/ttyUSB0 # When everything is working and all defaults are set: python3 t265_to_mavlink.py Tip
View all available input arguments: python3 t265_to_mavlink.py --help
Verification before testing
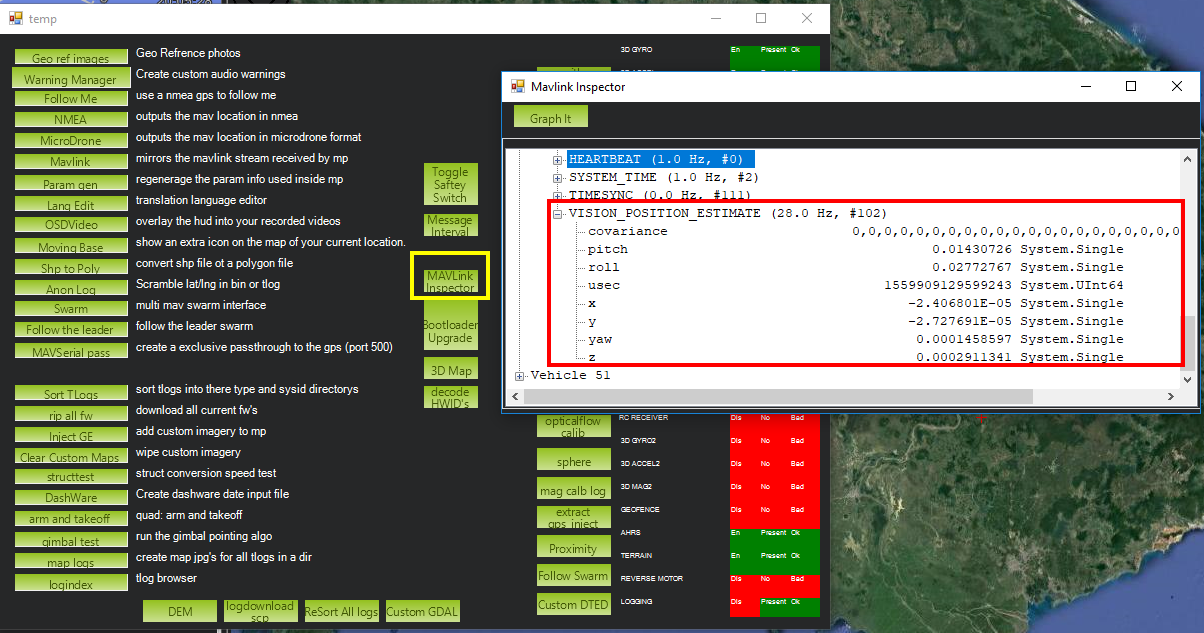
- To verify that ArduPilot is receiving
VISION_POSITION_ESTIMATEletters, on Mission Planner: printingCtrl+Fand click on "Mavlink Inspector", y'all should be able to see data coming in. The conviction level can be viewed in messageVISION_POSITION_DELTA, fieldconfidence.
- Changes in value of the tracking confidence level tin also exist notified on Mission Planner's message panel, HUD and past speech. These notifications will pop upward when the organization starts and when confidence level changes to a new state, for instance from
MediumtoHigh.- To enable speech in Mission Planner: Tab Config/Tuning > Planner > Voice communication > tick on "Enable speech".
- If there are some messages constantly displayed on the HUD, y'all might non be able to see / hear the conviction level notification.
- If telemetry is slow, notification might be dropped. You lot tin still see the latest message in MAVLink Inspector, message
STATUSTEXT. - If telemetry is very slow, it may exist flooded past VISION_POSITION_ESTIMATE messages. You tin disable message forwarding by setting fleck 10 in
SERIALx_OPTIONS. Be aware you will not receive VISION_POSITION_ESTIMATE in GCS anymore.
Ground Test
- Later on power on, ssh into the companion figurer, navigate to the script and run:
python3 t265_to_mavlink.py. - Expect until the quadcopter icon appears on the map of Mission Planner.
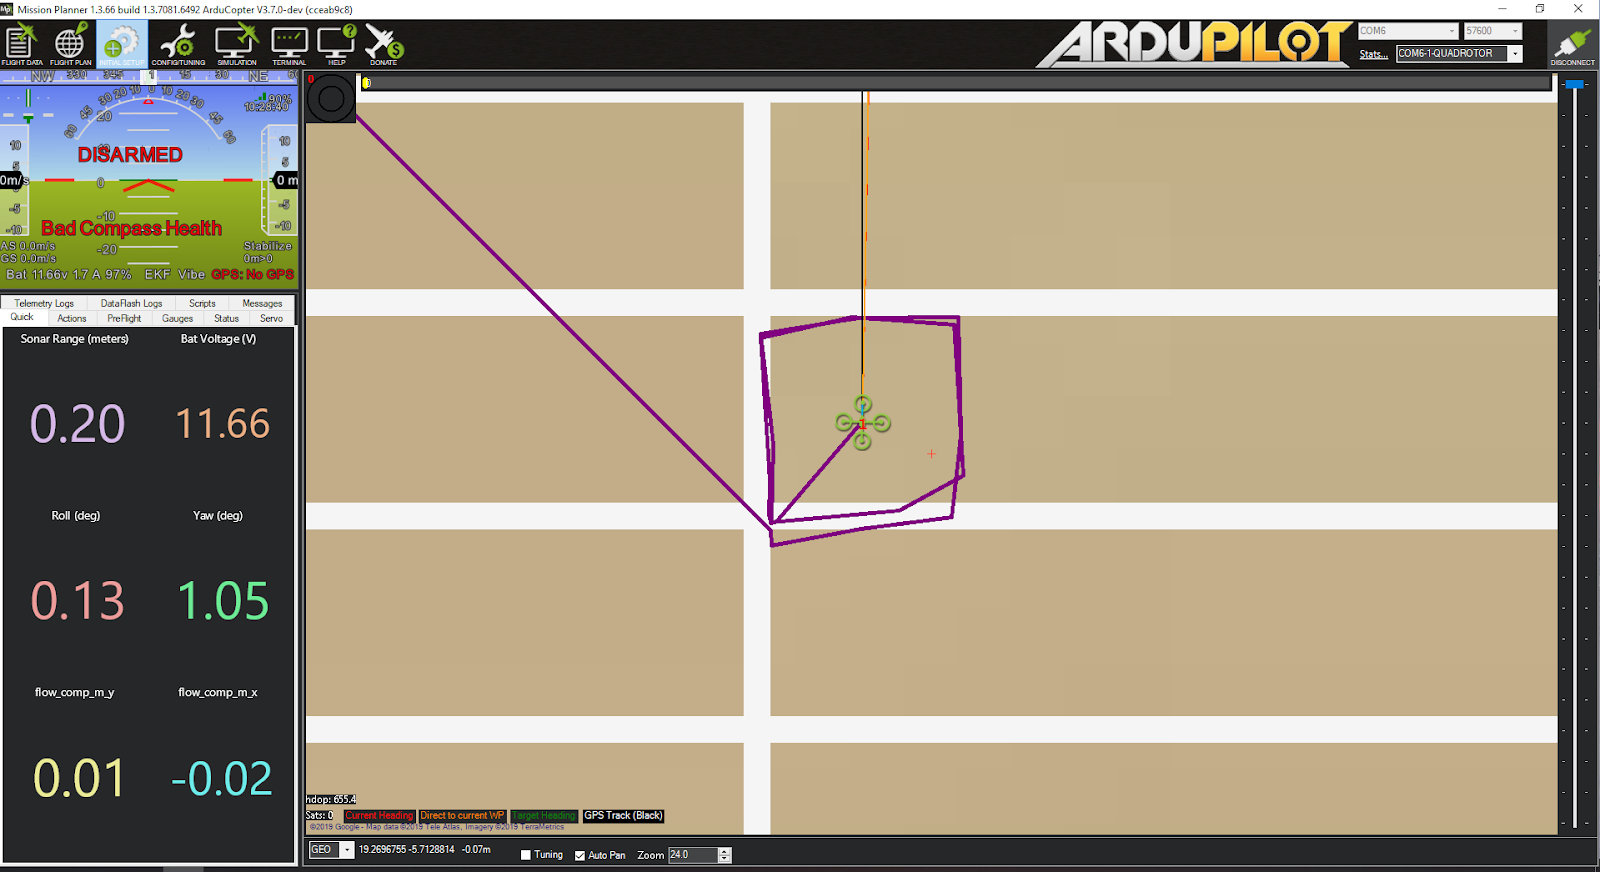
- Selection-up the vehicle and walk it around, check that the vehicle'due south position movements are shown on the map. The trajectory of the vehicle on the map should reverberate the real movements without too much baloney or overshoot. Below is an example of walking in a 2m 10 2m square.
- During the examination, view the confidence level and verify tracking operation. For most applications y'all should trust the total 6dof pose only in high confidence. If you but need the rotation (3dof), lower confidence poses tin can be used.
- If the external navigation information is lost for any reason (tracking lost, script is interrupted etc.), reboot the Autopilot.
Tip
If you are flying in a bars surroundings, it might be best to get around the safe perimeter of flying, view the trajectory on the map, and so remember not to fly/setup mission beyond that perimeter.
Flight Test
For your kickoff flight:
- Takeoff in Stabilize or Alt-Hold, check that the vehicle is stable.
- Motion the vehicle around and find the position on Mission Planner to run into if tracking is stable.
- Switch to Loiter, merely always ready to switch back to Stabilize/Alt-Agree if anything goes amiss.
- Otherwise, the vehicle should hover stably and able to keep its position.
- Motion the vehicle around (translate, rotate) at varying speed, ever ready to switch back to Stabilize/Alt-Hold.
If everything works as expected, adjacent time yous can arm and takeoff in Loiter mode.
Tip
E'er confirm that position feedback is running ok before switching to Loiter manner. Too wait out for the safety boundary in your surroundings, i.eastward. where tracking might get lost due to lack of features, fast or rotation motion.
Indoor and Outdoor Experiments
DataFlash logging
- The visual odometry information volition appear in the
VISOdataflash log letters. - EKF's visual odometry information will appear in XKFD letters
Autorun at boot
The script can be run automatically at kicking fourth dimension.
- Download or create a beat file
t265.sh, modify the path to t265_to_mavlink.py script in this beat file, and then get in executable:
wget https://raw.githubusercontent.com/thien94/vision_to_mavros/principal/scripts/t265.sh nano t265.sh # In t265.sh, modify the path to t265_to_mavlink.py, in my instance: # /home/ubuntu/catkin_ws/src/vision_to_mavros/scripts/t265_to_mavlink.py chmod +10 /path/to/t265.sh # Run test the shell. The script t265_to_mavlink.py should run as normal ./t265.sh - Depends on your system, use whatsoever method to make the script autorun at boot. In the steps beneath, we will apply
systemdto turn it into a service. - Let's create a file
/etc/systemd/arrangement/t265.servicewith the post-obit content. Set your actual username laterUser=and gear up the proper path to yourt265.shinExecStart=.
[Unit] Clarification =Realsense T265 Service After =multi-user.target StartLimitIntervalSec = 0 Conflicts = [Service] User =ubuntu EnvironmentFile = ExecStartPre = ExecStart =/home/ubuntu/catkin_ws/src/vision_to_mavros/scripts/t265.sh Restart =on-failure RestartSec = i [Install] WantedBy =multi-user.target - That'south it. Nosotros tin can at present start the service and automatically get information technology to start on kicking:
systemctl showtime t265 systemctl enable t265 Source: https://ardupilot.org/copter/docs/common-vio-tracking-camera.html
Posted by: trippentsion81.blogspot.com
0 Response to "How To Get Camera Feed Intel T265"
Post a Comment